Recently in Tips & Tricks Category

Previously, I wrote about how to add Edit Links to Entry and Page templates.

This guide uses the mt_user cookie set when logging into Movable Type to condition content (links to screens in MT) on entries and pages published by Movable Type.

Also provides an option to use a non-MT cookie to do the same thing.

With large volumes of code… sometimes it’s useful to place comments in the code to document what the code does.

In html, developers often use a html comment on a closing div tag to note which tag is being closed.

<div id="main-content">
    ...many lines of code here...
</div><!-- end of #main-content -->

Once the page is being published in the production environment, these comments are no longer necessary and just add to the weight of the file.

There are many ways to condition these links in Movable Type:

  • Create a Global Config template module and then set a variable in that template. Include this template module in all your templates and use the value to condition code.

    Global Config (use a value of 1 to show, 0 to hide)

    <mt:Var name="display_coments" value="0">
    

    Index Template

    <$mt:Include module="Global Config"$>
    <div id="main-content">
        ...many lines of code here...
    </div>
    <mt:If name="display_commnts">
        <!-- end of #main-content -->
    </mt:If>
    
  • Use configuration directives in your template. There are a bunch of useful Configuration Directives for Movable Type. Use the value of config directives in your templates as conditionals.

    In the mt-config.cgi file add config directives:

    # Config Directives
    ## Required
    CGIPath /cgi-bin/branch-hanson/
    Database mt_db
    DBUser foo
    DBPassword bar
    DBHost localhost
    
    
    ## Optional
    DebugMode 1  # See http://movabletype.org/config/DebugMode
    FooBar 3     # Made up config directive
    

    Use the DebugMode config directive:

    <mt:If name="config.DebugMode">
        <!-- comment here -->
    </mt:If>
    

    Or make up your own and use the value such as FooBar:

    <mt:If name="config.FooBar" eq="1">
        <!-- condition 1 comment here -->
    <mt:If name="config.FooBar" eq="2">
        <!-- condition 2 comment here -->
    <mt:Else>
        <!-- condition <$mt:Var name="config.FooBar"$> comment here -->
    </mt:If>
    

Hope either of these may be useful.
Stumbled across another way to Add Custom Styles for a Single Entry in Movable Type from the entry Individual Style on Khoi Vinh’s Subtraction.com.

  1. Create a css file using the same basename as your entry, but with a .css extension
  2. Place this bit of PHP in the <head> element next to your other stylesheet links:

    <?php
    // check to see if a css file with the same name as the permalink exists,
    // if so print a link to it
    if (file_exists("<$MTEntryPermalink$>.css")) {
        print '<link rel="stylesheet" type="text/css" href="<$MTEntryPermalink$>.css" />';
    }
    ?>
    

This is great if there are many rules to add and/or if there is a need to edit the css independently from the publishing of the entry.

For just a few simple rules I’d still add the rules inline. This has the benefit of keeping the styles directly associated to the content being styled.

Edit Links for Entry and Pages

| 3 Comments

Update: Advanced version using cookies to condition “edit” links

Add an edit links to your Movable Type entries and pages.

Ordering Categories (a hack)

| 2 Comments

One feature I’d like to add is the ability to order categories via some drag-n-drop method in Movable Type and then have the ability to specify the sort order manually via a sort_by template tag modifier like this:

<mt:Categories sort_by="manual">
    <!-- category code here -->
</mt:Categories>

Or just make this the default behavior!

Until then, here’s a hack to sort by a user-order specified.

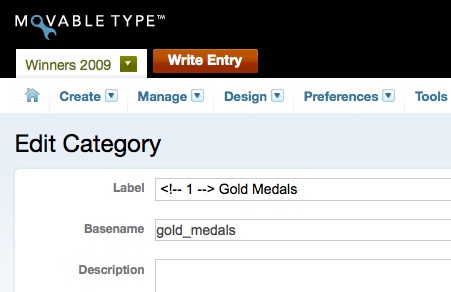
  1. Go to the Edit Categories screen.
  2. Using the “open link in new tab” option (right-click or command-click), click each category to open them in new tabs in the order that you want them in.
  3. Just before the text of the label, add an html comment and place a number in the comment. Make each html comment identical to ensure sorting works properly. Because the number is in an HTML comment, it won’t be displayed on your site, but the sorting will be correct!

hack-category-order.jpg

Here’s a way to set some variables for your whole blog.

Create a new template module called “Blog Config” containing some code which you want set for all blog pages published by MT; for example the page layout variable:

<$mt:Var name="page_layout" value="layout-wtt"$>

Then include it at the top of every index and archive template using the following code:

<$mt:Include module="Blog Config"$>

You can now update the page_layout in one template vs having to update it in all index and archive templates.

Action Streams Easy Installation

| 1 Comment

I was installing Action Streams on Chris Alden’s r21.org and remembered that Mark Pascal showed me tip about installing Action Streams.

Instead of distributing all the files in the extlib directory in the sub-directories of the extlib directory in your MT install—as described in steps 3 of the Action Steams readme—Mark showed me that the Action Streams extlib directory can be placed in the Action Streams plugin directory.

When you download the Action Streams plugin, here are the files in the directory. Notice the location of the extlib directory:

ActionStreams-1.0/
    example_templates/
    extlib/
        HTML/
        HTTP/
        Web/
        XML/
    mt-static/
    plugins/
        ActionStreams/
            blog_tmpl/
            config.yaml
            lib/
            tmpl/
        Iwtst/

When you install Action Streams in your MT install, move the extlib directory under the Action Streams plugin directory:

MT_HOME/
    plugins/
        ActionStreams/
            blog_tmpl/
            config.yaml
            extlib/
                HTML/
                HTTP/
                Web/
                XML/
            lib/
            tmpl/

Clean URLs for Tag & String Searches

| 4 Comments

Because Movable Type is not always installed on servers where customers have access to the servers apache config or an .htaccess file, MT’s tag and string search urls look like:

Tag Search and String Search (respectively)

http://chezbeau.com/cgi-bin/mt/mt-search.fcgi?blog_id=1&tag=tomato&limit=20
http://chezbeau.com/cgi-bin/mt/mt-search.fcgi?search=tomato&IncludeBlogs=1&limit=20

These can easily be changed to more “clean” urls

http://chezbeau.com/tag/tomato
http://chezbeau.com/search/tomato

To convert your Movable Type powered site to use clean urls, follow these steps:

  1. Edit your .htaccess file and add the following lines

    RewriteEngine on
    RewriteRule ^tag/(.*)$ /cgi-bin/mt/mt-search.fcgi?blog_id=1&tag=$1&limit=20
    RewriteRule ^search/(.*)$ /cgi-bin/mt/mt-search.fcgi?search=$1&IncludeBlogs=1&limit=20
    

    The first line RewriteEngine on turns on the Rewriting Engine. The second and third lines use RewriteRule to map the desired urls to the actual urls.

  2. Update tag links in tag clouds and on entry details by replacing <$mt:TagSearchLink encode_js="1"$> with:

    <$mt:BlogURL$>tag/<$mt:TagName normalize="1"$>
    
  3. Update search form.

    This requires a few more invasive changes:

    1. add class search-form to the <form> element
    2. Include a link to jquery in your header. Use a local file or remotely hosted file like this one on Google:

      <script type="text/javascript" src="http://ajax.googleapis.com/ajax/libs/jquery/1.2.6/jquery.min.js"></script>
      <script type="text/javascript">
      $(document).ready(function() {
          $('.search-form').submit(function() {
              window.location.href = "/search/" + $('.search-form input:text').val();
              return false;
          });
      });
      </script>
      

Notes:

Do Not Upgrade Plugin

| No Comments

Brad created a small plugin on the fly as a temporary fix to solve an upgrade issue which I’ve documented here for your pleasure… =)

This plugin will disable/stop/cancel all upgrades to a Movable Type installation.

Because some plugins require upgrade scripts, the DoNotUpgrade plugin must be removed/disabled/etc in order to perform upgrades to MT.

  1. Create a file:

    MT_DIR/plugins/DoNotUpgrade/config.yaml
    
  2. Add the following code to the file:

    callbacks:
        init_request: sub { MT->app->{upgrade_required} = 0 }
    

This plugin should work in 4.x versions of Movable Type.

Increase Basename Length for SEO URLs

| 2 Comments

Well authored urls make for good SEO. One the simplest ways to do this is to write good titles to your entries and then MT will dirify the title to create a basename from which the url to the entry is created. But if your entry title is longer than 100 characters, the rest of the url is clipped.

Good news! Basename can be increased to 250 characters. As it seems that most people would prefer unclipped urls to long urls, I added a feature request to increase the default to the max of 250 characters. Then if a user prefers to have smaller urls, they can modify this setting.

To change your default, navigate to Preferences > Entry Settings, and change Basename Length to your desired length.

Entry Settings - Adventures in Movable Type | Movable Type Pro